Archive for the ‘Cooking’ Category
Oven-Baked Jerk Chicken Drumsticks
I love to grill in the summer, but the weather for the long Canada Day weekend wasn’t too good this year. I wanted to make something spicy that didn’t require the BBQ, and this oven-baked jerk chicken drumstick recipe fit the bill nicely.
You want to marinade the drumsticks for as long as you can before cooking. 24 hours is great but typically I have a JIT dinner decision-making process so tend not to have that kind of time available. I usually manage 3-4 hours marinading which works fine.
I’ll put down exactly what recipe I used for the marinade but I’ll say there was too much liquid involved even though I’d skipped the orange juice (sadly due to my inability to tell oranges and grapefruits apart in the supermarket). Next time I make this I’m going to reduce the amount of liquid overall by about 25%.
Chicken
10 drumsticks, skin-on
Marinade ingredients – makes enough marinade for 10+ chicken drumsticks
4 cloves garlic
4 green onions
2 tbl dried thyme
2 tbl allspice
1.5 tbl brown sugar
2 tsp nutmeg
2 tsp pepper
1 tsp cinnamon
2 tbl olive oil
4 tbl white vinegar
4 tbl soy sauce
2 tbl bourbon or rum (optional but delicious!)
Juice and zest of an orange
Juice and zest of a lime
Habaneros to taste – AT LEAST 1 or 2 deseeded for flavour, more for heat. I used 6, seeds included. It’s not jerk without the peppers! And really you should use Scotch bonnets, but I don’t have a supplier for those.
Dump everything (except the chicken!) into a food processor and pulse it until everything is chopped up into small pieces and you have a sort of paste (with the amount of oil, vinegar etc. listed above it will be more of a thick, lumpy liquid). Rub it on the drumsticks, especially under the skin. Put them in the fridge, covered with the rest of the marinade, for 2-24 hours.
Take the chicken out of the fridge about 15 minutes before cooking, and preheat the oven to 375F. Put the drumsticks on baking trays lined with foil and sprayed with cooking spray. Put them in the oven and cook for around 40-45 minutes without turning. Make sure they’re cooked through properly, with clear juices, no pink in the center and an internal temperature of around 170 degrees.
They ended up delicious and spicy, but not so spicy that my wife couldn’t have them. I could go hotter myself!
I’ll add some pictures next time we make them, which probably won’t be too long 
Mushroom-Bacon Stuffed Pork Chops
It’s been a while since I made something new, and when a friend posted a new recipe on Facebook I decided to take the basic idea and change it up a bit. The original recipe uses bacon, apples and nuts for the stuffing – not being a big fan of the apples and nuts I changed them to chopped mushrooms and shallots.
It was a bit weird to me that the recipe is for the slow cooker yet doesn’t use any liquid. It seems after doing some research though that it’s not really that unusual, even though it happens to be the first thing I’ve made this way. What ends up happening is that moisture is released from the food while cooking and trapped by the lid, so it makes its own liquid.
Incidentally the preparation time for this is no joke. It took me two hours to chop, slice, measure and pre-cook everything! So plan ahead accordingly.
Ingredients:
4 boneless pork chops, at least an inch thick
90g white mushrooms, chopped
170g crimini mushrooms, chopped
6 slices of bacon, cut into 1-inch pieces
4 garlic cloves, minced
3 shallots, diced
1 large onion, cut into rings
1 tsp smoked paprika for the stuffing mixture (optional)
First the mushrooms: clean them, slice thinly then chop into approximately 1cm pieces. I had to saute them in three batches (you don’t want to overcrowd the pan when frying mushrooms as they’ll release too much water). It was at this point I realized I was adding three types of mushrooms – white, crimini and er, burnt crimini. They cook pretty fast when cut up this small! I fried my first batch for around 6 minutes; that was too long, and so I went down to 2-3 minutes for the other batches, using a medium-high heat. Add the mushrooms to a mixing bowl when they’re done.
Cut up the bacon; I trim off and discard a lot of the fat at this point. Drop it into your hot pan and fry until it’s almost done. Add the shallots, saute for another minute or so then add the garlic. I like to fry garlic for just 20 seconds or so, just long enough for it to release that amazing smell. Used a slotted spoon to drop the contents of the pan into your mixing bowl, leaving as much bacon fat in the pan as you can manage. Take the pan off the heat and drop in the onion rings to coat them with the bacon fat, then add half of them to the bottom of the slow cooker to act as a bed for the pork.
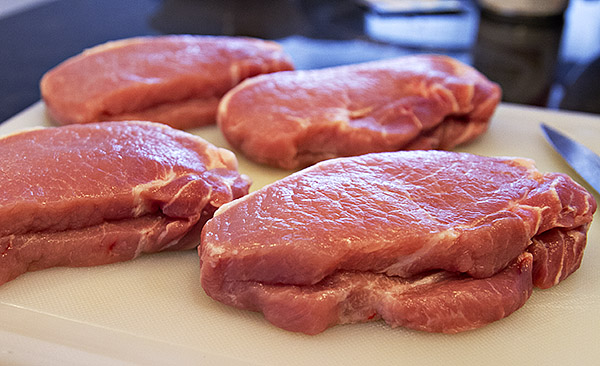
The chops, showing where to make the cut for the filling.
Speaking of the pork, you can get it ready now. Give the chops a rinse, pat them dry and cut a pocket into them in the side opposite the fat (the picture above should make it more obvious what I mean). Don’t cut all the way through. Mix up your stuffing, optionally adding the smoked paprika as you do so, and fill each porky pocket as full as you like. Use some wooden toothpicks to keep the chops together, then put them upright in the slow cooker. Cook them for 8 hours on low, or 2 hours high/4 hours low if you have less time. Now, while you’re waiting, clean up the kitchen!

The stuffed chops, closed with toothpicks, waiting to go into the slow cooker.
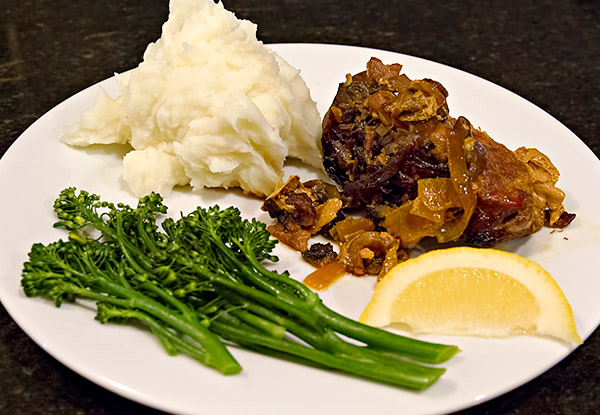
I was pleased how things turned out. During cooking the kitchen smells incredible! The onions caramelize and everything goes a wonderful dark colour. We had the chops with mashed potato and some broccolini, and spooned some of the extra filling and liquid from the pot over the top. Louise LOVED them; I liked them a lot, but thought the pork was just a little bit dry. I was happy though that the filling, my own recipe, came out best and was my favourite part of the dish 
Duck with Potato Pancetta Truffle Hash
Posted by: DaveS in Cooking, Restaurants on March 4th, 2012
After a recent landmark event (which I should really make a post about), Louise and I visited a restaurant that we’ve always wanted to go to – Bin 941 on Davie Street. It’s a “small plates” restaurant serving a variety of excellent West Coast food – lamb, seafood, short ribs, steak etc. The duck that we ordered especially impressed me; I honestly think it’s one of the best things I’ve eaten in a restaurant, and when we got home and I checked out their website, I was excited to find that they’d actually posted the recipe!
Now, I’m not going to link to their recipe because after experimenting last night, it’s massively inaccurate. I’m not sure what planet the recipe writer inhabits where frying raw potatoes for two minutes gives you delicious hash browns, but it’s not the one that my kitchen sits on. So you get the benefit of my learning here!
One thing I’ll say about this recipe… when cooking at home I like to eat cheaply, and this ain’t that. I paid $20 for the duck breast, and truffle oil might as well be liquid gold for what they charge for it (and yes I’m aware of the whole argument raging for/against truffle oil in the first place. I love the flavour and know a lot of good chefs who use it so that’s the side I come down on). I think it’s almost cheaper to eat this at the restaurant, though of course they’ll get you on drinks! There’s also a cranberry-port sauce as part of this recipe but it’s time-intensive and involves yet more expensive ingredients so I just omitted it for reasons of time, finances and sanity. It’s just not possible to do it at a reasonable cost without the economy of scale provided by a restaurant. So if you’re looking for cheap eats… move along please 
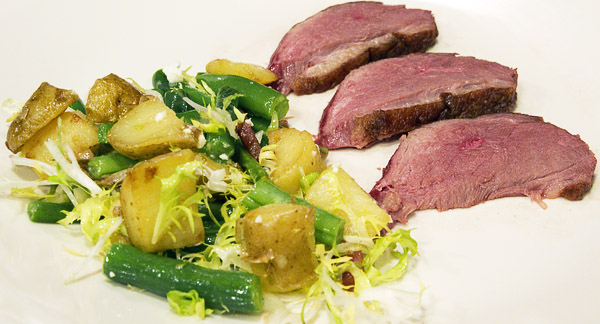
Yes, my arrangement skills failed me here. I just wanted to eat!
Crispy Duck
Ingredients: 1 large Mulard or Muscovy duck breast, skin on
Preheat the oven to 375 degrees.
Cut the duck breast in half across the middle, and cut a diamond pattern into the skin and fat without cutting into the meat itself.
Heat up a seasoned cast iron or oven-safe frying pan (with the tiniest amount of cooking spray in it) over a medium-hot burner. When it’s up to temperature, put the duck breast pieces in skin side down, and let it sear for 5 minutes or so (I actually would have liked my skin crispier so I’ll probably go for 6 or 7 minutes next time). Remove the duck, pour off the rendered fat into a pyrex or otherwise heatproof container, and add the duck back to the pan flesh side down. Sear for a minute, then flip it back to the skin side and put the whole pan in the oven. Cook for 10-12 minutes, or until a thermometer says 125 degrees for medium rare, 135 for medium. Let it sit for 5 minutes before slicing once you’ve removed it from the oven.
Potato Pancetta Hash
Ingredients:
Approx. 8 fingerling potatoes (nugget potatoes can be a substitute)
30g pancetta, diced
1.5 cups green beans, trimmed and cut into approx 4cm pieces
1/4 cup goat cheese, crumbled
3-4 tbls white truffle oil
Half a head of frisee greens
Salt
Scrub the potatoes and add to a pan with cold water. Heat the pan until it boils, drop in some salt, turn the heat down to a good simmer and continue to boil for 10 minutes. Drain and dry when done, let them cool for 10-20 minutes then dice the potatoes into about 2cm wedges, about 12 per potato.
Add the reserved duck fat to another frying pan and heat until hot. Drop in the potatoes and diced pancetta and cook for around 5-6 minutes, until the potatoes are almost golden and crispy. Add the green beans, stir, and pour in 2-3 tablespoons of truffle oil, continuing to mix everything up as you do. After a minute or so of this turn off the heat; drop in the crumbled feta cheese and remove everything to a large bowl or plate lined with paper towels. Add the frisee greens, mix once more, finish with a little more truffle oil and serve.
Chicken with chili and shallot sauce
Yes, a new post! Don’t faint!
I made my chicken with chili sauce again this weekend and it’s so good, I have to blog it so it’s preserved for posterity. It’s an extremely simple marinade that tastes amazing.
Approx 1LB chicken, diced for stir-fry
3 tbsp lime juice (that’s about the amount you get out of one lime)
3 tbsp olive oil
2 tbsp Worcestershire sauce
2 shallots, roughly chopped
1/2 cup of Sriracha chili sauce
Chop the shallots up and put in a freezer ziploc-style bag. Add the rest of the marinade ingredients. Cut up the chicken and add it to the bag – seal it and mush things around a bit to make sure the chicken gets covered. Put it in the fridge for 2 hours.
Spray a saute pan with Pam cooking spray and heat over med-high to high heat (so don’t use non-stick). Drop in the whole contents of the ziploc when it’s hot, and cook until the chicken is done and the sauce has boiled and reduced by almost half, about 7-8 minutes.
That’s all there is to it. We usually have it with salad and some nice bread rolls. The chili sauce is amazing; personally I think it’s the shallots that really take it over the edge. The Sriracha sauce is diluted by the oil and lime juice and has reduced in the pan so it’s not overwhelmingly spicy, but it does have a nice kick.
This recipe gives you about 4 servings if you have a lot of salad with the chicken! If you need a salad dressing, I’ve been making my own and have settled on this:
1 tbsp sesame oil
1 tbsp red wine vinegar
2 tbsp cider vinegar
1/2 tsp dried oregano
1/2 tsp dried basil
1/2 tsp parsley flakes
1/2 tsp red pepper flakes
Takes 30 seconds to make and is delicious!
Seared Ahi Tuna with Roasted Yams, Endive Salad and Wasabi Mustard Sauce
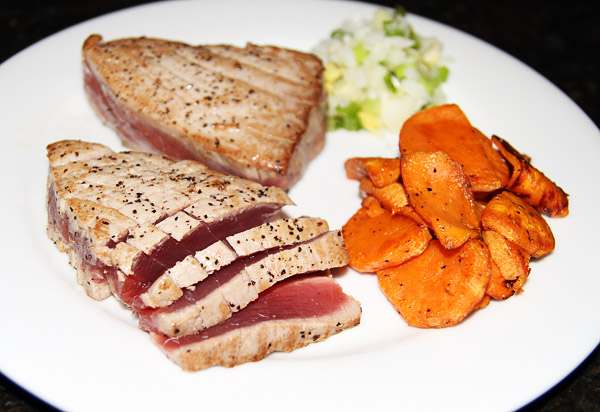
When my wife and I visited Hawaii a couple of years ago, one of the foods we fell in love with was poke – the Hawaiian version of sushi in some ways, using raw or barely-cooked fish typically mixed with other ingredients like sweet onion or cabbage and simple soy-based sauces. Ahi tuna (aka yellowfin or Hawaiian tuna) is one of the common fish used for poke, and is deliciously melty when eaten rare or just seared long enough to form a flavourful crust over a rare, red interior. Duke’s restaurant makes amazing ahi tuna poke rolls that I loved, and I wanted to use some elements of that dish in my own first attempt at using ahi. Most of the recipe here though is taken from this post from DrewCooks.com.
Ingredients:
300g (10 oz) ahi tuna, cut into two 1-inch-thick steaks
2 medium yams, peeled and roughly sliced
1 endive
1/4 of a sweet onion, finely diced
2 green onions, diced
1 lemon
Salt and pepper
For the sauce:
2 tsp wasabi mustard
4 tsp dijon mustard
2 tbls soy sauce
2 tsp water
Make the salad first – I didn’t and had time to regret it as my yams cooled! Peel the outer leaves off the endive and chop off the stalk end, then cut it in half lengthways and chop into half-round pieces. Put the pieces in a bowl, then dice your sweet onion and green onion and mix everything together. Squeeze half a lemon over the salad, add a bit of extra-virgin olive oil and combine.
To cook the yams, start with a pan you can use in the oven – I used a cast-iron pan. Preheat the oven to 375 degrees. Use 1-2 tbls of olive oil, and saute the chopped yam at a medium-high heat for 5 minutes or so with a little bit of salt and pepper, turning a few times, then put the whole pan in the oven for another 12 minutes.
Now you can sear the tuna while the yams are in the oven. This part is really easy! You want the steaks to be an inch or so thick, so cut them up if necessary. Season the fish with some salt and pepper on both sides, and heat up some oil in a pan at a medium-hot heat. Drop in some butter (I used 2 tbls or so for two pieces of fish), let it melt and then drop in the tuna. You want to sear the top and bottom for about a minute, and I liked to sear each edge for a few seconds too just for show.
Finally, the wasabi mustard sauce. I had the hardest time finding “wasabi mustard” – I did finally find some by Inglehoffer in Urban Fare here in Vancouver but I’m pretty sure horseradish mustard is a perfectly fine substitute. Combine the wasabi mustard, mustard, soy sauce and water in a bowl and mix until smooth and even. I found that the quantities above made about twice as much as we needed so I’ll halve the recipe next time.
For a first try everything came out great and the tuna was delicious with the sauce. In terms of cost, the tuna was $18 and everything else around $6, so that makes it about $12 per person – not really cheap but very nice to treat yourself at the weekend!
Chili v1.2: Triple-B
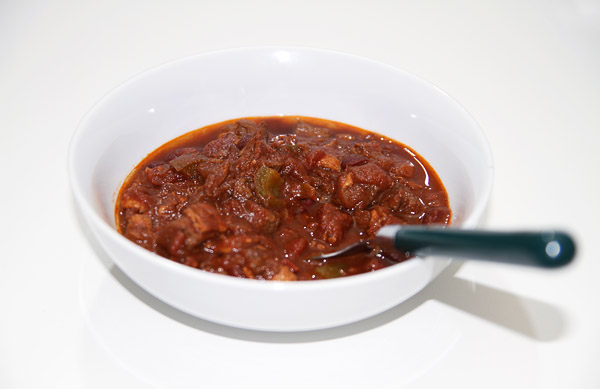
My chili recipe is evolving. v1.1 involved a different spice mix, and v1.2 brings us the Triple-B – beef, beer and bacon! I’m also using cubed sirloin instead of ground beef, just to see which I prefer.
New ingredients:
750g sirloin steak
9 or 10 rashers of bacon
2 tbl chili powder
1 tbl ancho chili powder
1 tbl paprika
1.5 tsp cumin
1 tsp smoked paprika
0.5 tsp ground oregano
The rest of the ingredients are the same as the original recipe:
Large yellow onion, roughly diced
28oz tin of diced tomatoes
Small tin tomato sauce
2 cloves garlic, minced
19oz tin of red kidney beans, drained and washed
1 cup sliced pickled jalapenos
1 green pepper, cored/seeded and diced
Cut up the steak(s) into cubes around 1.5cm on a side. Take the bacon and cut it crosswise into 1cm wide slices. Heat a skillet sprayed with cooking spray over a medium-high heat, and drop in the bacon when it’s hot. I cooked the bacon for just a couple of minutes, long enough to render out some fat and have it start to crisp up. Remove the bacon and place on kitchen towels to drain, then drop in the beef to brown it in the bacon fat (I had to do it in a couple of batches). Remove and drain as you did the bacon. Now add the onion and saute it in the beef/bacon fat with a bit of salt and pepper. Don’t brown it but cook until it goes transparent, then remove and drain.
Then chuck everything except the green pepper in the crockpot and cook on low for 7 hours. Put the pepper in at the end and cook for another 15-30 minutes on high. I sometimes do this last step uncovered to lose some moisture if it’s too saucy. Warning: house will fill with amazing smell about 3 hours before you can eat. Slow cookers are so cruel.
It came out pretty great. Turns out I prefer using steak to ground beef. It’s about 50% more expensive and more hassle to prepare. Typical!
Chili v1.0
Wow, it’s been a long time since I updated. I have an excuse though… I made a post almost a couple of years ago when friends of mine were laid off from work but I avoided the cut; well, it happened again, on a much bigger scale, and this time I wasn’t so lucky. Still, after a tense few weeks I found another job, and thankfully things are beginning to get back to normal. So without further ado, let’s talk about food 
I bought a slow cooker a few weeks ago, and I’ve only used it a couple of times so far. Last week we made ginger beef (recipe here, though you might need to make an account to see it) and this week I wanted to try making some chili.
I spent ages looking at recipes, and eventually decided to make my own, pulling in all the stuff I liked from the various different methods. For a first try it worked really well! So here’s what I did. Texas-style chili purists, I’ll warn you ahead of time that it includes things like ground beef, tomatoes and kidney beans, so prepare your hate emails now!
Ingredients, for 4-6 servings:
- 750g lean ground beef
- A large onion, chopped
- 28oz can of diced tomatoes
- 8oz can of tomato sauce
- 2 cloves of garlic, minced
- 1/2-cup of chopped pickled jalapenos (Canadians, I used a brand called Scarpone’s, Safeway sells it in jars alongside the pickles etc)
- 19oz can of red kidney beans, drained and washed
- 1/4-cup chili powder
- 1 1/2 tsp cumin
- 1/2 tsp salt x 2 (1/2 tsp in the chili, 1/2 tsp when sauteeing the onion)
- 1/2 tsp pepper x 2 (ditto)
- 2 tbl olive oil
- 1 cup beer (I used Phillip’s Phoenix gold lager, it’s darker and richer than most lagers and I had a bottle sitting around in the fridge)
Method:
Brown the beef in a large pan or skillet using the oil, on a medium heat it takes around 10 minutes. Remove from pan using a slotted spoon and place on a plate covered in a triple layer of kitchen paper to drain. Using the same oil, saute the chopped onion with some salt and pepper for 5 minutes or so until it’s soft. Remove and drain like you did the beef.
(Note that preparing all the ingredients and cooking the beef and onion took me a bit over an hour altogether. I’d only anticipated half an hour so if you’re no faster than me, factor that in!)
Put everything in the crockpot and stir it all up. My 5-quart pot was roughly half-filled using the quantities in the ingredients list above. Cover and cook on a low heat for 6-8 hours; I did it for 6h 30m and it was very good, but with maybe a little too much liquid left. Cooking longer would probably take care of that, and you could even cook it uncovered on high for the last 15 minutes to allow some moisture to escape.
Despite the jalapenos and the large amount of chili powder, I didn’t think it was too spicy. Louise thought it was hot enough and wouldn’t want it any hotter, but I would  I’d be tempted to chop up a fresh habanero and stir that in too if it was just me eating it.
Serve with grated cheddar on top and some crusty bread. When I was a kid we always had jacket potatoes with this, that’d work well too.
This was damn tasty, and luckily we have enough leftovers for a day or two. If you have any suggestions for modifications, let me know! Must go, have to watch the HBO Game of Thrones documentary over and over!
Related post: Chili v1.2 – Triple B
Jalapeno Burgers and Yam Fries
Summer seems to have finally arrived in Vancouver. We’ve had some sporadic good weather up until this heatwave though, and I’ve managed to experiment with my “perfect” burger recipe (in quotes as nothing is perfect of course!). I love spicy food so I wanted to try making a jalapeno beef burger after trying one at a local BBQ place.
1 cup pickled jalapenos, diced
1lb (480g) lean ground beef (not extra lean, you want lean as it’s more juicy)
Between 1/4 and 1/2 a medium onion, diced
2 tbsp breadcrumbs
1/4 cup Worcestershire sauce
1 tsp chili powder
1 tsp garlic powder
1/4 tsp black pepper
1/4 tsp salt
Yield: 4 burgers
Mix all of the ingredients together in a large bowl by hand. Form into four 1/4lb patties, with a bit of a depression in the middle (make it by pushing your fist into the burger; you do this so the patty doesnt’ swell up while cooking). Cook for 5 minutes per side on a medium-hot grill (around 400-450 degrees) over direct heat. If you want cheese, add the slice to the burger about a minute before cooking is done, and toast the buns at the same time if your grill has a toasting rack.
The jalapenos don’t add too much heat, just a little spicy kick and some flavour. I tried variations of this recipe using an egg, but didn’t find any use for it really; it doesn’t seem to add anything except calories. The mixture above should hold together just fine on the grill. You can freeze any leftover patties, raw – I keep them for up to a month in the freezer then take them out, defrost overnight in the fridge and cook them up, just as good as fresh!
Sometimes we do some yam “fries” in the oven with the burgers. Again with the quotation marks as they’re not fried but baked. The recipe is pretty simple:
2 yams, cut into long chips
1 tbsp olive oil (extra virgin if you have it)
2 tsp smoked paprika
1 tsp ground cayenne pepper
1/2 tsp cumin
Mix the yam fries in a bowl with the olive oil and spices. Preheat the oven to 450 degrees and place the fries on 2 baking sheets. Cook for 10 minutes, remove from the oven and turn, then cook for another 10-15 minutes. Serve sprinked with sea salt and a garlic-mayo dip or aioli.
They’re usually not too crispy when cooked like this which is a bit of a shame, but they’re still really good.
Mango-Habanero Shrimp
I found the first fresh habaneros of the year in the supermarket this weekend, and as we had a couple of pounds of shrimp in the freezer I thought I’d try something slightly different with the other habanero shrimp recipe we used last year.
Ingredients (4 servings):
- 1lb peeled/deveined shrimp
- 1 habanero, chopped
- 1 orange pepper, sliced
- 4 cloves garlic, minced
- 2 tsp fresh ginger, chopped
- 2 mangoes, juiced
- 2 tsp olive oil
- Salt and pepper to taste
Over a high heat, warm the oil and drop the shrimp and sliced pepper in when hot. Stir constantly and cook for a minute, then add the ginger and habanero. Cook for 1m30s, then add the garlic. After another 30s or so the garlic should be fragrant and the shrimp should be done; pour in the mango juice, add the salt and pepper, stir to coat the shrimp, and let the sauce reduce for a minute or so. Remove from pan and serve with cilantro rice.
Very simple and good. It wasn’t quite as fruity as I’d expected though… I might try marinading the shrimp next time. Spice level was moderate with one habanero, I think 1 and a half might be optimal. Adding some sea salt at the end was really good.
Roast Beef
There’s not much I like more than some medium-rare beef with Yorkshire puddings and gravy! The cut I got today was a standing rib roast, half-price this week at Safeway so I got a 1.8kg (3.8lb) roast, which should feed us for at least two full meals and probably more. Even at half-price it costs $25 so you don’t want to mess it up.
First I added a rub, then let the meat stand for a couple of hours to bring it close to room temperature. Here are my rub ingredients:
– 6 cloves of garlic, minced
– 1 tsp dried basil (would have used fresh but I forgot to buy some!)
– 1/2 tsp onion powder
– Enough coarse kosher salt and black pepper to cover
There are a few ways to cook the roast, and each one has its proponents:
1) Sear on a stove-top skillet, or in the oven at 500 degrees, then roast in the oven at 225 degrees for a few hours. Slow, but maintains a similar doneness throughout the meat, unlike the other methods where the center is less done than the ends.
2) Cook at 325 degrees throughout until done.
3) Sear in the oven at 500 degrees for 15 minutes, then cook at 325 until done. Quicker than method #1.
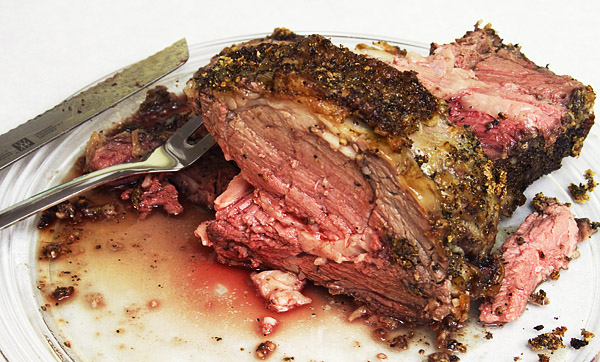
I went with the third method this time, and it turned out pretty good. It would have been better had the internet sources (just about all of them) and my Good Housekeeping book not disagreed on the doneness temperatures. Almost every internet recipe I looked at had rare being 125 degrees, but the cookbook (and my oven thermometer!) has rare being 140 degrees. I ended up pulling out the roast at 135 degrees to split the difference, after which the internal temperature kept rising as the meat rested to a high of 145 (not unexpected). The beef was a little overdone, with some rare parts but most at medium, so next time I plan to take it out of the oven at 128 degrees or so.
Here’s a really unattractive picture showing how it turned out; I was in a hurry to eat!
I also made roast potatoes, and Yorkshire puddings using the rendered beef fat which turned out nice, and Louise prepared some carrots and broccoli. One thing that didn’t work out this time was the gravy; I’ve had some leftover Bisto granules kicking around for a few months (sealed up), which I combine with some red wine, the beef drippings and a bit of water, and it always tastes great. This time though it was revolting; I tried again without the wine and beef drippings and it was just as bad, so I think the granules had gone off or something. So we made do with lots of mint sauce. Anyone who says mint sauce is just for lamb has clearly never tried it with beef!


