So you’ve got your camera and lens picked out, let’s take some pictures!
If you have a full manual mode on the camera, I highly recommend using it. You’ll have full control over the shot and if you’re familiar with your equipment, you’ll be able to make changes on the fly (mandatory aircraft pun). If not, or you’re not comfortable with using it, stick to Tv or shutter priority mode. As you’ll see, the most important part of the exposure setting with aircraft is the shutter speed, and you’ll want control over that.
Whichever mode you use, aperture isn’t usually very important; at the distances you’ll be dealing with, depth of field won’t be a problem, so either you can ignore aperture completely or force it to be at the sharpest setting for your lens (many lenses will be less sharp “wide open”, meaning the largest aperture, which as you ought to know is the SMALLEST f-stop number. I don’t want to get bogged down talking about exposure basics, so if that’s confusing, go look up a basic photography primer then come back).
When it comes to the aircraft type, choosing the right shutter speed is vital. Jets are easy – choose as high a speed as possible, 1/1000 or higher. This will get you a high proportion of sharp pictures as long as you pan with the airplane as you take the shots. You might need to increase the ISO speed to get to 1/1000 – on an SLR it’s not a problem to use ISO 200, but I generally don’t go higher than that.
For propeller planes though, you want a speed of around 1/250. The reason for this is so that you don’t stop the props, which looks unnatural and makes the plane look like a model. 1/200 is great too, but the lower you go, the fewer shots you’ll find are sharp. Finally, for helicopters, slower is better, 1/160 or even lower is good. In general, their rotors spin slower than a propeller so you have to go slow too to get that blur.

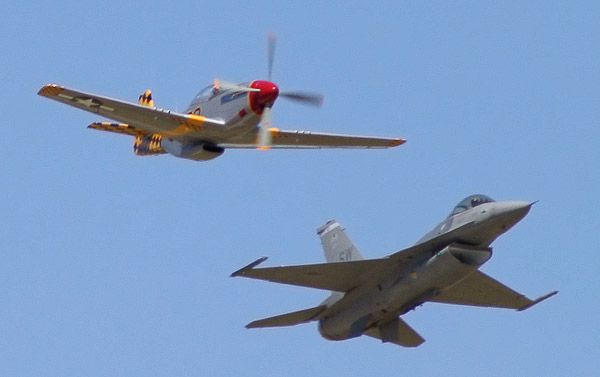
Canon 10D, 1/750 f/8.0 ISO 200, 300mm. I took this fairly terrible pic at a speed of 1/750 by mistake, and look at the prop on the Mustang - almost stationary. Don't do this!
When it comes to the actual exposure, the key thing to remember is that the camera wants to under-expose, especially if you’re in an evaluative mode. The light meter is seeing that big expanse of sky and clouds and is trying to recommend you an exposure to make that look good. But we don’t care about the sky, we care about the airplane in the middle of the shot! The darker your subject is, the more you’ll want to push the exposure, but a rule of thumb for a mid-grey airplane is to over-expose by about 1 stop. With a dark paint scheme like you’ll find on a USAF C-130 or F-15, you might even want to go higher. But don’t go too far – you don’t want blown highlights on the airplane, and in extreme cases a severely blown-out overcast sky can wash out the whole picture. Remember you almost always get several passes by an aircraft, so don’t be afraid to bracket shots – take a range of exposures to make sure you get something you can work with.

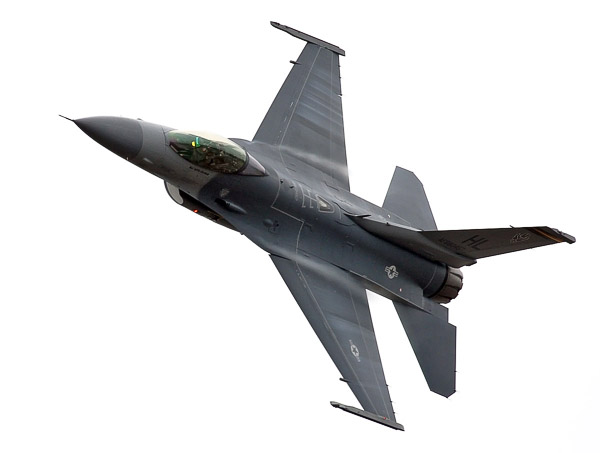
Canon 40D, 1/1000 f6.3 ISO 200, 400mm. A dark plane against a whited-out sky like this needs a longer exposure than the light meter thinks - but don't overdo it!
Finally, a word on which way you’re facing. Taking pictures of flying aircraft at an airshow isn’t like most other photography, where you have the freedom to walk around and pick an angle – you’re almost always going to be standing parallel to the runway. Ideally, if you’re in the northern hemisphere, you’ll be facing north. This way, the sun will be behind you the whole time lighting your subjects up as they pass in front of you. If you’re looking east or west, you’ll have to alter your settings throughout the day as the sun passes overhead. You’ll be shooting into the sun for some of the day; the rest of the time conditions will be good though. If you’re unlucky, you’ll be facing south, shooting into the sun the whole time. This will backlight the aircraft, reduce contrast, force you to change settings mid-pan, and generally make the whole day a pain in the ass. There’s nothing you can do to control this – just be aware of it and make sure you take the direction of the light into account.
EXPOSURE SUMMARY
– Use manual or Tv mode on your camera
– Shoot jets at 1/1000 or higher
– Shoot propellers at 1/250 or lower
– Shoot helicopters at 1/160 or lower
– Increase the exposure around 1 stop for dark aircraft
– Watch out for south-facing crowd lines!
Next time I’ll talk about focus, and some ideas on shots to aim for – and shots to avoid!
#1 by Mike E on September 13th, 2009 - 11:15 am
Unless I am mistaken, I believe what you meant to say is that the camera wants to under-expose, but then you correctly go on to recommend adding exposure. Helpful advice. Thanks.
#2 by DaveS on October 4th, 2009 - 3:02 pm
Thanks Mike, you’re right! I corrected the post.